Learning CenterWhat is a mineral?The most common minerals on earthInformation for EducatorsMindat ArticlesThe ElementsThe Rock H. Currier Digital LibraryGeologic Time
搜索矿物的性质搜索矿物的化学Advanced Locality Search随意显示任何一 种矿物Random Locality使用minID搜索邻近产地Search Articles搜索词汇表更多搜索选项
╳Discussions
💬 Home🔎 Search📅 LatestGroups
EducationOpen discussion area.Fakes & FraudsOpen discussion area.Field CollectingOpen discussion area.FossilsOpen discussion area.Gems and GemologyOpen discussion area.GeneralOpen discussion area.How to ContributeOpen discussion area.Identity HelpOpen discussion area.Improving Mindat.orgOpen discussion area.LocalitiesOpen discussion area.Lost and Stolen SpecimensOpen discussion area.MarketplaceOpen discussion area.MeteoritesOpen discussion area.Mindat ProductsOpen discussion area.Mineral ExchangesOpen discussion area.Mineral PhotographyOpen discussion area.Mineral ShowsOpen discussion area.Mineralogical ClassificationOpen discussion area.Mineralogy CourseOpen discussion area.MineralsOpen discussion area.Minerals and MuseumsOpen discussion area.PhotosOpen discussion area.Techniques for CollectorsOpen discussion area.The Rock H. Currier Digital LibraryOpen discussion area.UV MineralsOpen discussion area.Recent Images in Discussions


Mineral PhotographyBack-lighting.

22nd Oct 2011 19:29 UTCStephen Eglinton
Fishing around for ideas on back-lighting gem crystals for photography. You have most probably seen the thing where the lens is at front and the torch is at the rear, with the crystal positioned between them.
Had in mind a backing with an adjustable opening, with the light source behind this opening.
Someone advised me to buy a photographic "iris" for this purpose.
I know the result i am after, but i'm kind of stuck with the gear to buy and putting it together.
Steve.
2nd Jan 2012 22:57 UTCAnonymous User
You can get it with something like a focusing LED torch/flashlight, set to spot, shone through the specimen at an angle so it MISSES the camera. Any light the specimen scatters will be visible in the camera. (Polarise the light, then try with another polariser on the camera and it gets even more interesting!)
(Not "circular" polarisers, you really need linear - and the one on the camera's called an "analyzer", but its the same)
In a microscope you have a large diameter lens (condenser) on the other side of the subject, with the light source the other side of the condenser. If you put a black disc in the middle of the condenser lens, you get a ring of backlighting coming through the subject., all missing the lens.
3rd Jan 2012 01:33 UTCStephen Eglinton
Thanks heaps for your help.:)-D
Best,
Steve.

3rd Jan 2012 20:29 UTCEugene & Sharon Cisneros Expert
Proper darkfield illumination usually requires a special condenser designed especially for that purpose. Here is a link to detailed info on Darkfield Illumination. The last part of the article describes how a brightfield microscope can be converted to darkfield.
Gene
3rd Jan 2012 22:41 UTCAnonymous User
Years ago I used a pair of slide projectors with a hole punched through an opaque (metal foil) slide, focused on the subject from about 45 degrees, behind, one each side in each. The background came out blackety black on Velvia 50D while I was struggling to stop the highlights blowing (as usual with that film). More cntrast that I could handle. The light coming through my girlfriend's hand was interesting too. Mine was no good - I'm too dense, obviously:-S
Photographers call it backlight, microscopists have to have a fancy word for it ;) but sure, "Darkfiled" is what to look up. You can buy odd microscope condensers for 10 bucks on ebay, but any torch/flashlight put right behind the subject, with the middle blacked out, would work, to "varying degrees" - pun intended.
If you have too wide an angle of light ( which microscopists call a large Numerical Aperture Condenser) you get more internal reflections going on in a thick specimen, and quite different light at the edge of the specimen (Imagine a wine glass).
Another cheap source of a suitable, bigger light/condenser would be an old enlarger. (Black and white type, not color) which are practically valueless now of course. You'd cut some metal foil discs of different sizes and just stick them on.
23rd Feb 2012 00:14 UTCOwen Lewis
For 'backlighting' I'd suggest you try a small light table that uses a white LED as a the light source and a diffusing white translucent platform on which to set your subject above the light. For this to work, the subject needs to be:
- Translucent/transparent.
- Wider that the LED light source.
If the sample is smaller than the LED,, get a piece of black card or similar and make a small hole in it. Place the card on the light table with the hole centralised on the LED and with the centre of your subject placed over the hole in the card. Having several such cards with different size holes in them achieves what an adustable iris achieves but at less cost and complexity (that said, I do use adjustable irises integrated into both my microscope bases).
The Osram 'Pocket Dragon' is one such small, pocketable and battery-driven light source. It enables two levels of illumination without noticable shift in colour temperature. OTOH, you could make an equivalent box on the kitchen table with parts from Radio Shack/Maplins. When 'out and about', it's a great transmitted light source to use with a folding polariscope too.
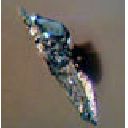
Here are tthree pics at different angles of a small piece of dark Sapphire rough (9x8x6mm) taken using this technique. I think it brings out the strong pleochoism of this specimen (and its beauty) very well. And all with a lighting system that cost less than 30 bucks, shop bought! The hi-res shots (before downsizing for web-pic display) have even more impact when displayed full screen.
Try this technique and see if it works for you?
.
25th Feb 2012 07:37 UTCRon Gibbs
The unit could be adapted to several different scopes and moved as needed. I think it ended up costing me about $125. The darkfield condensor came from AmScope and cost about $70. The LED which was only used for viewing with my eyes, ran about $50 on E-Bay.
26th Feb 2012 13:23 UTCStephen Eglinton
Thank you guys for the help. I am now talking with my photographic shop regards the set-up, and ordering the gear.
Much indebtet to all.:-)
Best,
Steve.


版权所有© mindat.org1993年至2024年,除了规定的地方。 Mindat.org全赖于全球数千个以上成员和支持者们的参与。
隐私政策 - 条款和条款细则 - 联络我们 - Report a bug/vulnerability Current server date and time: 2024.4.18 02:46:19
隐私政策 - 条款和条款细则 - 联络我们 - Report a bug/vulnerability Current server date and time: 2024.4.18 02:46:19